How to display an HTML popup window when my phone rings with JavaScript API
Below you can find an excellent way on how to follow your calls easily using JavaScript API. By displaying an HTTP popup window, it is quite simple to receive notifications about the calls made through your own website.
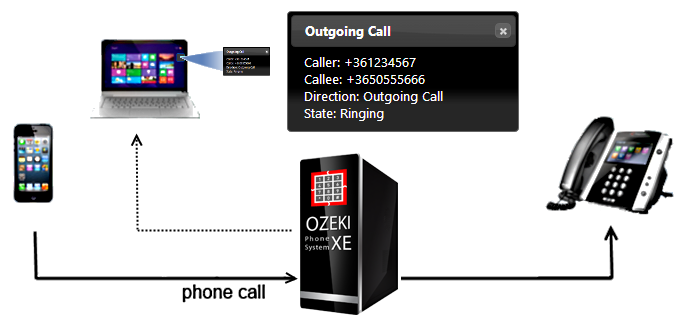
Figure 1 - System architecture
For this purpose, you only have to execute the following steps:
- Step 1: Check the full code of the example
- Step 2: Generate Security Token for the authentication
- Step 3: Connect to Ozeki Phone System XE through JavaScript API
- Step 4: Subscribe for the sessionCreated and sessionStateChanged event
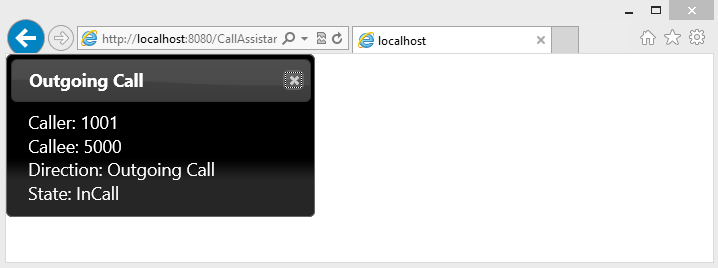
- Step 5: When the sessionStateChanged event is triggered, show a Popup with the details of the call
After these steps, you will receive a notification in the form of Popup on your own site every time when a call is created in the system. Of course, there are more possibilities in JavaScript API, but this article gives information about about the call created and call state changed events.
Let’s see each step in details!
Step 1: Check the full code of the example
- <!DOCTYPE html>
- <!--Important:This file is have to be hosted on a web server(e.g. Apache,IIS etc.)-->
- <html>
- <head>
- <link rel="stylesheet" type="text/css" href="http://code.jquery.com/ui/1.10.3/themes/ui-darkness/jquery-ui.min.css" />
- <script type="text/javascript" src="http://code.jquery.com/jquery-latest.min.js" />
- <script type="text/javascript" src="http://code.jquery.com/ui/1.10.3/jquery-ui.min.js" />
- <script type="text/javascript" src="http://ozekixepbx.ip:7777/WebphoneAPI" />
- <script type="text/javascript">
- //////// Use your settings //////////
- var serverAddress = "ozekixepbx.ip";
- var securityToken = "vQTJzve0J0mYsnvWjnnoUA";
- var numberToSubscribe = "1001";
- ////////////////////////////////////
- $( document ).ready(function() {
- OzWebClient.onConnectionStateChanged(connectionStateChanged);
- OzWebClient.connect(serverAddress, securityToken);
- });
- function connectionStateChanged(info) {
- console.log(info.State);
- if (info.State == ConnectionState.ACCESS_GRANTED){
- OzWebClient.onSessionCreated (sessionCreated);
- OzWebClient.onSessionClosed (sessionClosed);
- }
- else if (info.State == ConnectionState.ACCESS_DENIED)
- console.log("Please check the validity of your Security Token!");
- else
- console.log("Please check the availability of the PBX!");
- }
- function sessionCreated(session) {
- session.onSessionStateChanged(sessionStateChanged);
- }
- function sessionClosed(session) {
- closePopUp();
- }
- function sessionStateChanged(session, sessionState ) {
- if (session.caller == numberToSubscribe || session.callee == numberToSubscribe){
- showPopUp(session.source, session.destination, session.direction, session.sessionState);
- }
- }
- //Close the Pop-up if is exist
- function closePopUp(){
- if ($("#NoficationPopup"))
- $("#NoficationPopup").dialog("destroy").remove();
- }
- //Show or modify the Pop-up
- function showPopUp(caller, callee, direction, state){
- if ($("#NoficationPopup").length > 0){
- $("#lbCaller").html('Caller: ' + caller);
- $("#lbCallee").html('Callee: ' + callee);
- $("#lbDirection").html('Direction: ' + direction);
- $("#lbState").html('State: ' + state);
- }
- else {
- $('<div id="NoficationPopup" title=\"' + direction + '\">' +
- '<div align=left>' +
- '<label id="lbCaller">Caller: '+caller+'</label> <BR />' +
- '<label id="lbCallee">Callee: '+callee+'</label> <BR />' +
- '<label id="lbDirection">Direction: '+direction+'</label><BR/>' +
- '<label id="lbState">State: '+state+'</label> <BR />' +
- '</div> ' +
- '</div>')
- .dialog({
- resizable: false, position: [0,0], minWidth: 250, minHeight: 100,
- close: function () {
- $(this).dialog("destroy").remove();
- }});
- }
- }
- </script>
- </head>
- <body>
- </body>
- </html>
Code example 1 - Full code of the downloadable example
Step 2: Generate Security Token for the authentication
In order to be able to see the created calls in the system, you have to get access from the PBX for your application. You can do this by generate a Security Token for your program and with that token you can connect to PBX.
You have the possibility to use a generated Security Token for the signin. In case of the Security Token it can be given what it can be used for and until what time, 1 day is default. Such possibilities for usage are:
- Sending a message
- Initiating calls inside or outside the system (mobile and line calls)
- Query of the Call Information
- and a lot of others
We can get a Security Token through HTTP API (if it is enabled), or we can generate it in the system after logging in with the GenerateSecurityToken Command of the HTTP API Tester.
To get a Security Token through HTTP API, you should send a simple HTTP request to the PBX and the needed token is going to be in the given response.
In the code example below you can see what request parameters should be sent to the PBX.
- Command=GenerateSecurityToken
- AuthXml=<?xml version="1.0"?>
- <SecurityToken>
- <AllowSessionModification>False</AllowSessionModification>
- </SecurityToken>
Code example 2 - The original HTTP Request
The specified url parameter list and the whole request is in the code below. You can send the request like you copy the url encoded text below to the headline of your browser. Of course you have to change the IP address to the address of the PBX here, too:
http://ozekixepbx.ip:7780/?Command=GenerateSecurityToken&AuthXml=%3c%3fxml+version%3d%221.0%22%3f%3e%0d%0a%3cSecurityToken%3e%0d%0a%09%3cAllowSessionModification%3eTrue%3c%2fAllowSessionModification%3e%0d%0a%3c%2fSecurityToken%3e%0d%0a
Code example 3 - Url encoded request
On the summary page below you can get further information about the HTTP API and the commands of it.
The other method for getting the needed Security Token is that you login to the PBX and generate the token on your own with the aid of HTTP API Tester.
For this, choose the Productivity/HTTP API menu fom the menu line above in the PBX. Then choose theGenerateSecurityToken Command, click on the Test tab, then to the Send request button!

Figure 2 - Generate Security Token with HTTP API Tester
The generated Security Token can be found in the received response between the <SecurityToken> tags.
Step 3: Connect to Ozeki Phone System XE through JavaScript API
As for the start create a simple HTML page where you refer a few scripts and JavaScript API, too. The created file has to be hosted and run on a Web-server, because it will result in an error if it is simply run on the file system (for example from Windows Explorer).
- <!DOCTYPE html>
- <!-- Important: This file has to be hosted on a web server (e.g. Apache, IIS etc.) -->
- <html>
- <head>
- <link rel="stylesheet" type="text/css" href="http://code.jquery.com/ui/1.10.3/themes/ui-darkness/jquery-ui.min.css" />
- <script type="text/javascript" src="http://code.jquery.com/jquery-latest.min.js"></script>
- <script type="text/javascript" src="http://code.jquery.com/ui/1.10.3/jquery-ui.min.js"></script>
- <script type="text/javascript" src="http://ozekixepbx.ip:7777/WebphoneAPI"></script>
- <script type="text/javascript">
- <!-- Your scripts will be here -->
- </script>
- </head>
- <body>
- </body>
- </html>
Code example 4 - The basic HTML page that is going to be extended step by step.
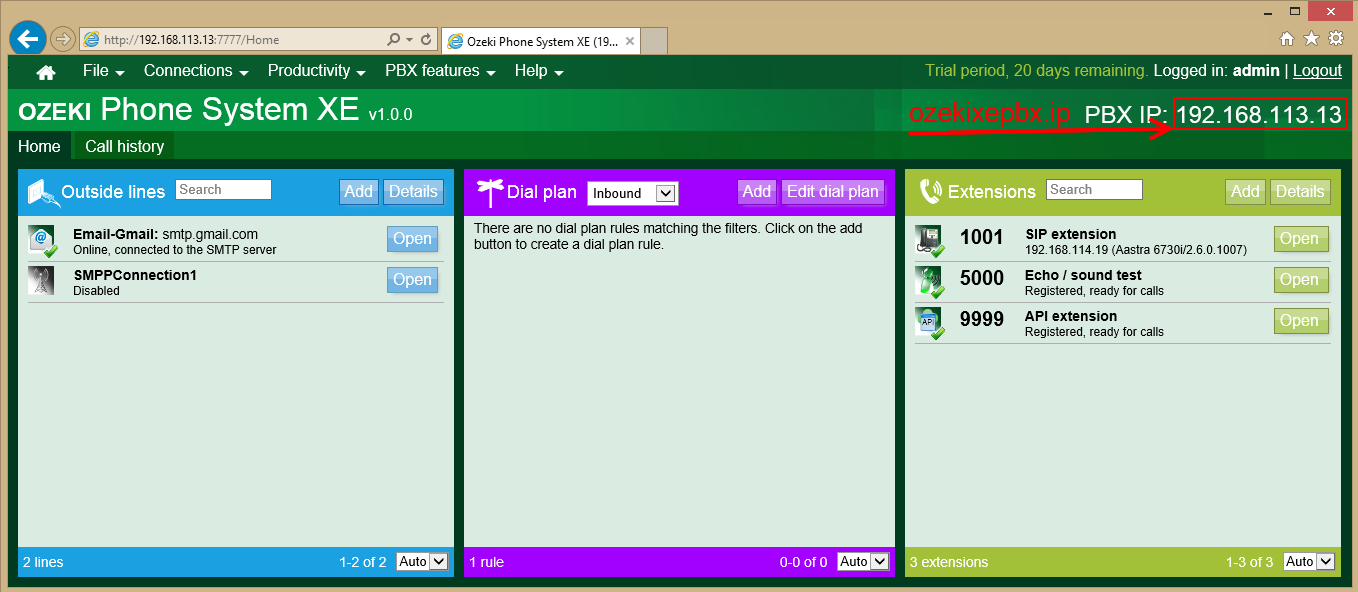
Figure 3 - Address of your PBX
The row below is going to add reference to the JavaScript API via the running Ozeki Phone System XE. Please use your own IP address of your installed PBX instead of the ozekixepbx.ip.
- <script type="text/javascript" src="http://ozekixepbx.ip:7777/WebphoneAPI"/>;
Code example 5 - Adding reference to the JavaScript API
When you are ready with this, you can start to write the more interesting code parts. First we will see some variables and the connection.
- <script type="text/javascript">
- <!-- Your scripts will be here -->
- //////// Use your settings //////////
- var serverAddress = "ozekixepbx.ip";
- var numberToSubscribe = "1001";
- var securityToken = "nixtwtqHr0qTRk9FcrV8Sg" ;
- ////////////////////////////////////
- $( document ).ready(function() {
- OzWebClient.onConnectionStateChanged(connectionStateChanged);
- OzWebClient.connect(serverAddress, securityToken);
- });
- </script>
Code example 6 - Variables to be changed, and connection to the PBX
The numberToSubscribe should be a phone number. We take it as a basic that we are curious for the events of only this phone number. But in case of a need it is extendable, of course, and this requirement can even be left.
After clarifying the role of the variables we can see the real connection. Before we connect, we should subscribe for the OzWebClient.onConnectionStateChanged event. We can achieve this by subscribing theconnectionStateChanged method that is going to be mentioned later. After this we should call theOzWebClient.connect method. There is the address of the PBX and the requested Security Token.
Step 4: Subscribe for the sessionCreated and sessionStateChanged event
We have already initiated the connection request towards the server earlier, and we get the response from it in the subscribing connectionStateChange method:
- function connectionStateChanged(info) {
- if (info.State == ConnectionState.ACCESS_GRANTED)
- OzWebClient.onSessionCreated (sessionCreated);
- else if (info.State == ConnectionState.ACCESS_DENIED)
- console.log("Please check the validity of your Security Token!");
- else
- console.log("Please check the availability of the PBX!");
- }
Code example 7 - Subscribing function that gives back the response of the PBX to the login request.
We can see that the info.State parameter of the function carries the response of the server. If the login was successful, we subscribe for the OzWebClient.onSessionCreated event. So when a new call is created in the PBX, the subscribing method will be called:
- function sessionCreated(session) {
- session.onSessionStateChanged(sessionStateChanged);
- }
Code example 8 - Function that is called when a call is created.
We subscribe for the changes of the call state in the function, so every time when it gets into another state (Setup, Ringing, Incall, Completed etc. ) we receive a notification through the sessionStateChangedmethod.
Step 5: When the sessionStateChanged event is triggered, show a Popup
As soon as the onSessionStateChanged event is triggered, the function below is called:
- function sessionStateChanged(session, sessionState ) {
- if (session.caller == numberToSubscribe || session.callee == numberToSubscribe){
- showPopUp(session.source, session.destination, session.direction, session.sessionState);
- }
- }
Code example 9 - Function called when the call state changes
We get the actual session in the function, that carries the information about the actual call in its parameters. In the function above we check whether the phone number of the caller or the callee is the same as the phone number given by us (numberToSubscribe), and if it is, then we call the showPopUp method with the parameters of the call:
- function showPopUp(source, destination, direction, state){
- if ($("#NoficationPopup").length > 0){
- $("#lbCaller").html('Caller: ' + caller);
- $("#lbCallee").html('Callee: ' + callee);
- $("#lbDirection").html('Direction: ' + direction);
- $("#lbState").html('State: ' + state);
- }
- else
- $('<div id="NoficationPopup" title=\"' + direction + '\">' +
- '<div align=left>' +
- '<label id="lbCaller">Caller: '+source+'</label> <BR />' +
- '<label id="lbCallee">Callee: '+destination+'</label> <BR />' +
- '<label id="lbDirection">Direction: '+direction+'</label> <BR />' +
- '<label id="lbState">State: '+state+'</label> <BR />' +
- '</div> ' +
- '</div>')
- .dialog({
- resizable: false, position: [0,0], minWidth: 250, minHeight: 100,
- close: function () {
- $(this).dialog("destroy").remove();
- }});
- }
Code example 10 - A function that executes the showing of a Popup.
We can see that when the Popup is not in the foreground, we create it, having uploaded with the appropriate values. If we have already showed this dialogue earlier, we modify its values.