
How to setup and customize
your Ozeki Webphone Gateway
Ozeki Webphone Gateway offers to make different type of webphones. You can use the built-in webphone types of the gateway, or you can customize it using HTML, CSS and JavaScript programming languages. By connecting a webpage to the Ozeki Webphone Gateway it will be possible for your customers to reach your support staff easily from any web browser without any charge. In this guide you can see how to setup and use the Developer friendly webphone type that can be fully customizable by developers. In addition, you can get information about how to setup your firewall if it is neccessary.
How to customize
Ozeki Webphone Gateway
How to setup firewall
to all features work properly
This guide helps you to build your own Webphone Gateway. It shows how to connect your webpage with your Ozeki Webphone Gateway together, how to personalize it based on your own requirements and how to configure your firewall.
System architecture
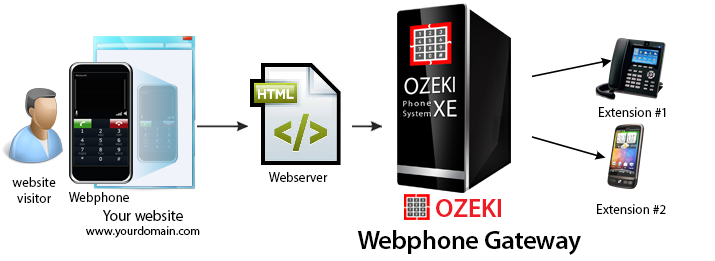
Figure 1 - Connect with Developer friendly mode
If you follow the steps of the configuration guide below, you will have own CMS system which is connected to Ozeki Phone System XE Webphone Gateway. The system will work as follows:
- Add new Webphone Outside line
- Generate a customizable HTML code
- Place the source code on your web page and connect the Webphone to Ozeki Phone System XE
- Setup your firewall to all features work properly
Configuration steps
The following steps give instructions about how to customize your Webphone in your Ozeki Phone System XE. You can see how to place the webphone on your web site. Before you start to configure this solution it is assumed that you have already installed your Ozeki Phone System XE, downloaded from this page.
Step 1.) Add new Webphone Outside line
First, open a web browser and login to the Ozeki Phone System XE. On the left page find the Outside Lines section of the web page, find Add button and click on it to install new outside line (Figure 2).
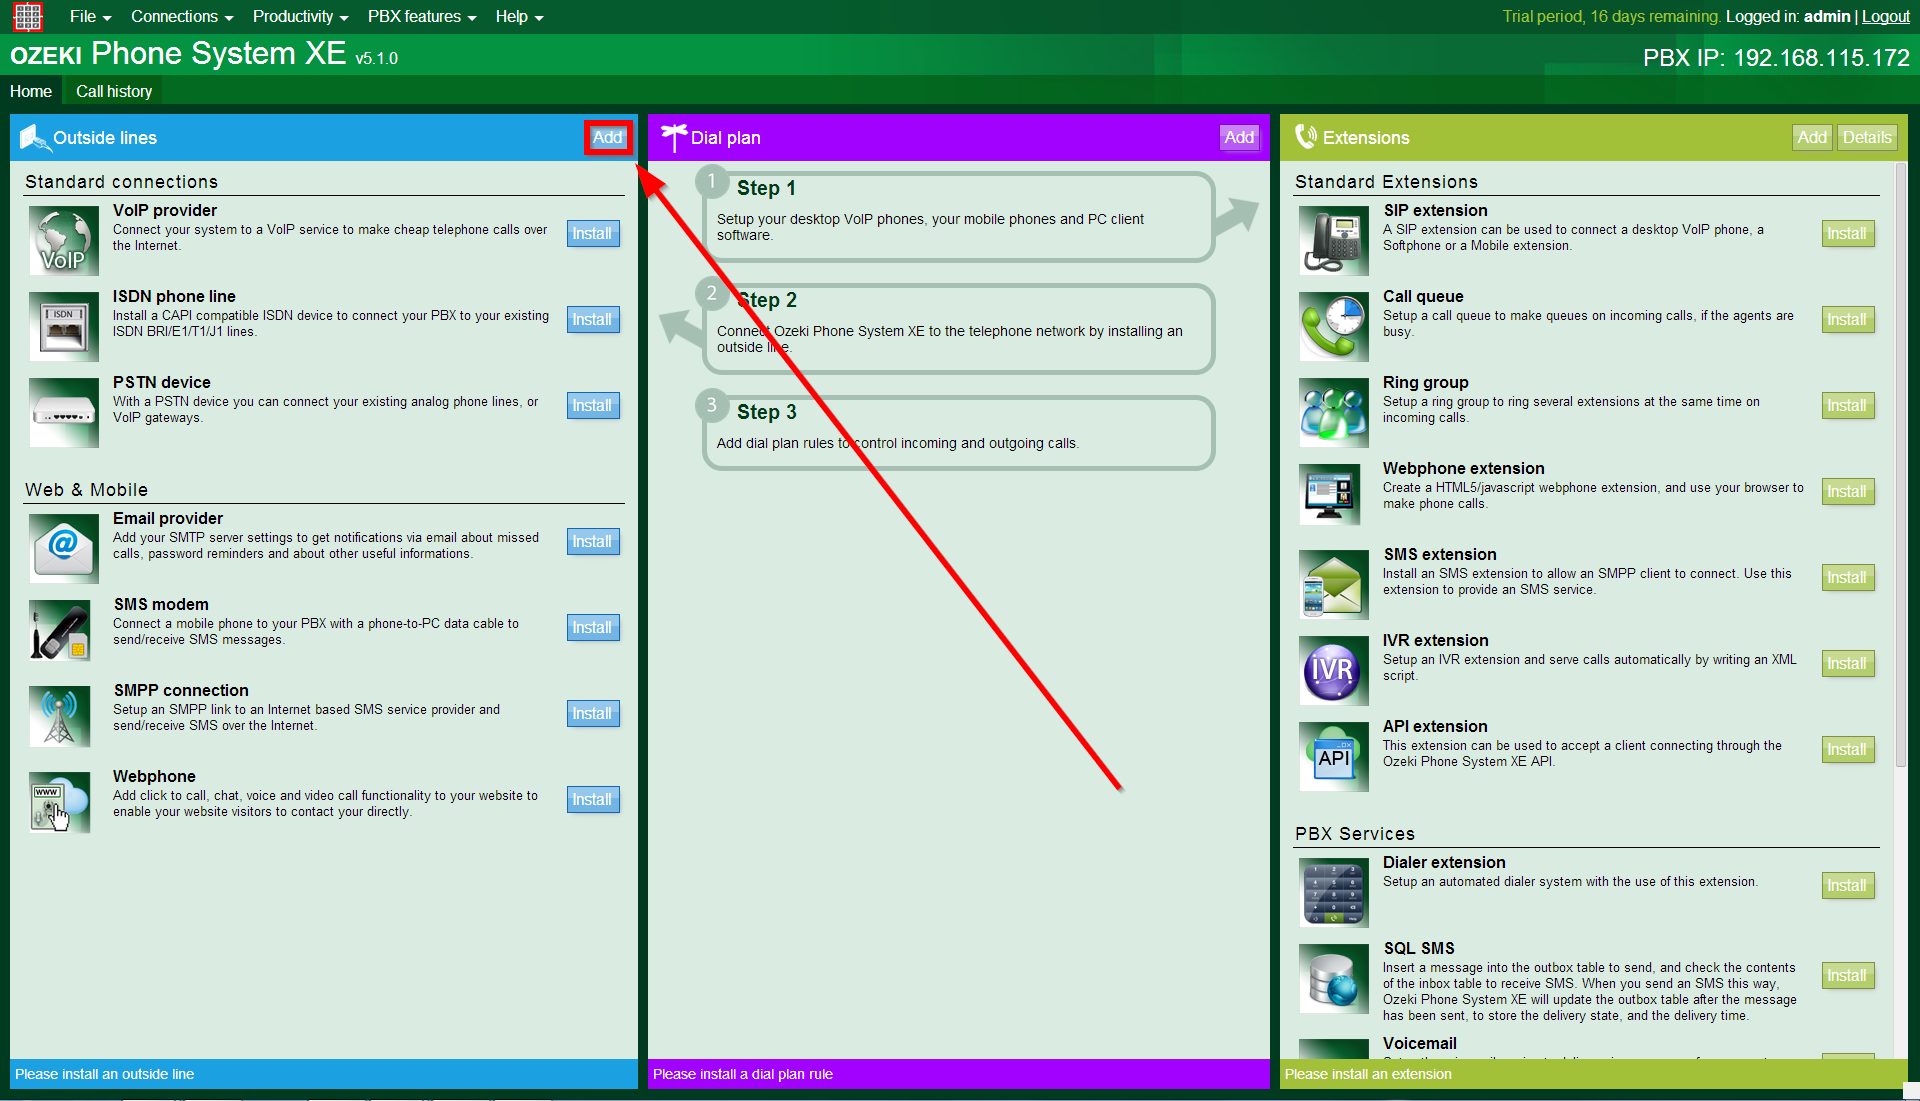
Figure 2 - Add new Outside Line
On the following page in the Web & Mobile section a Webphone label can be seen. Click the Installbutton next to it (Figure 3).
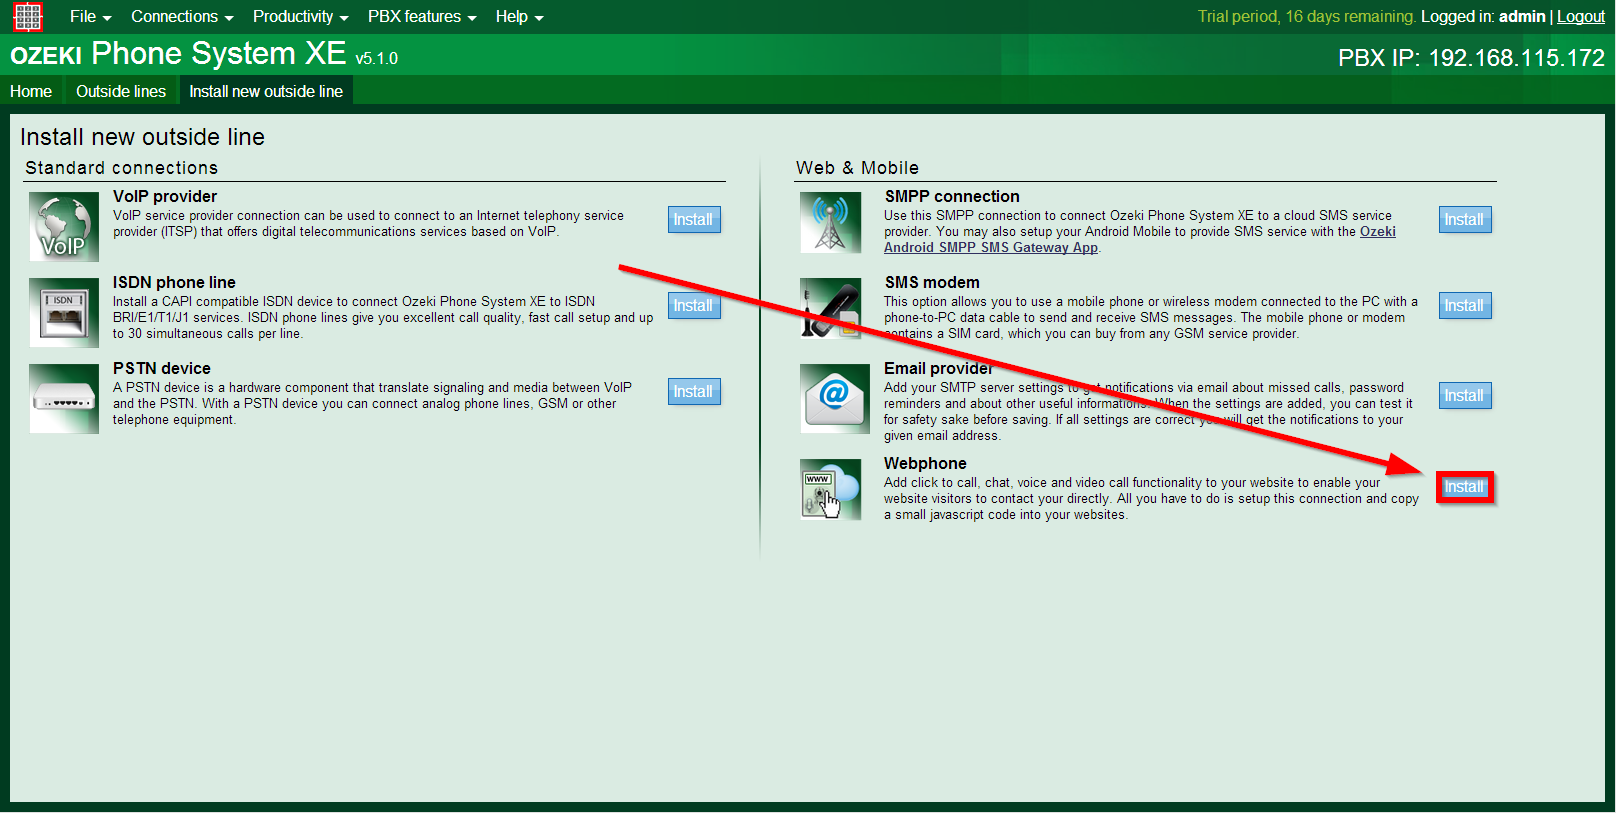
Figure 3 - Install new Webphone
Now the configuration screen appears. In the Identification section you can define a unique name for this connection (or accept the default Webphone1 name) (Figure 4).
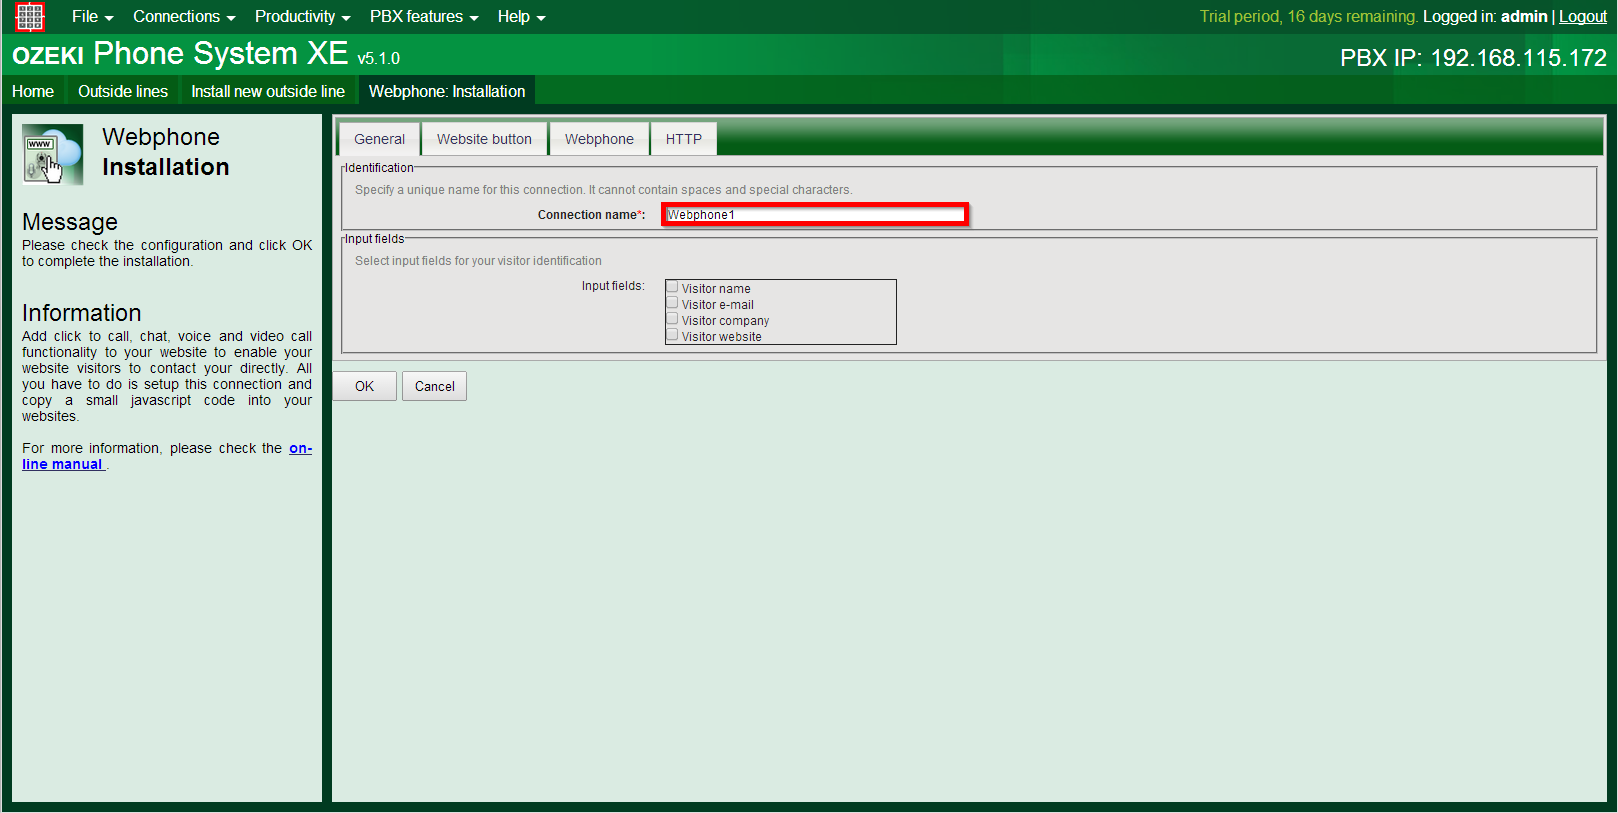
Figure 4 - Specify a name for your Webphone connection
Under Webphone button tab you can add a unique website button to display operator availability on your web site by selecting the Custom option and browsing an online and an offline png picture (170x80px). If you want to use the default button select the first option called Use built in operator status display button... (Figure 5).
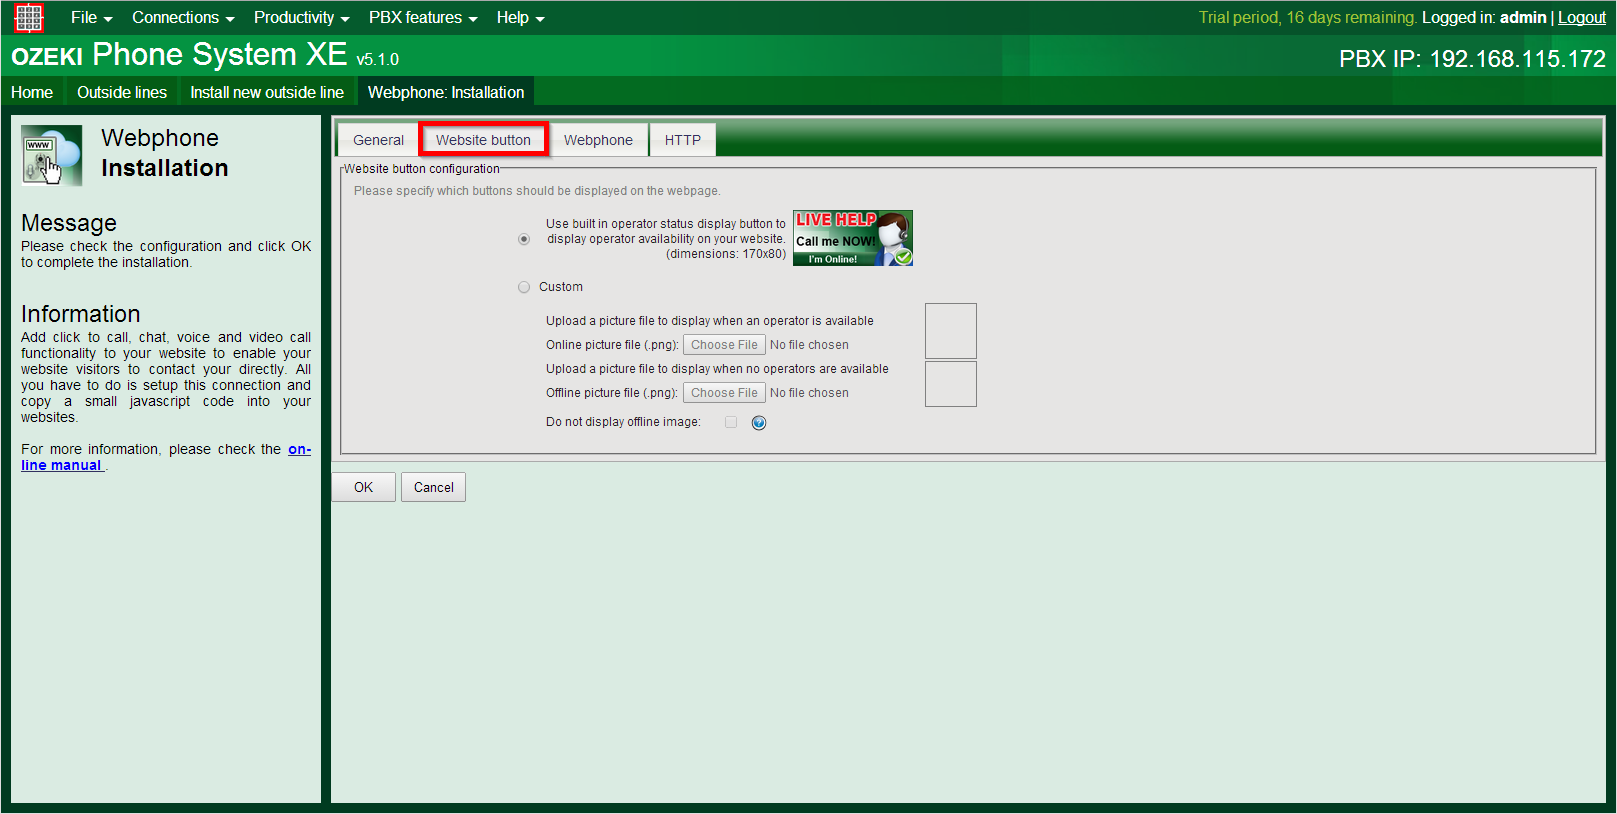
Figure 5 - Select a button for displaying operator availability
Under Webphone tab you can select the type of webphones you would like to use (Figure 6). In this guide you can see how to use a Developer friendly webphone.

Figure 6 - Choose webphone type
Figure 7 shows the HTTP port options. By default the webphone service works on the same port like the graphical user interface. If you check the Override default settings. You can give the desired HTTP and HTTPS port, as well.
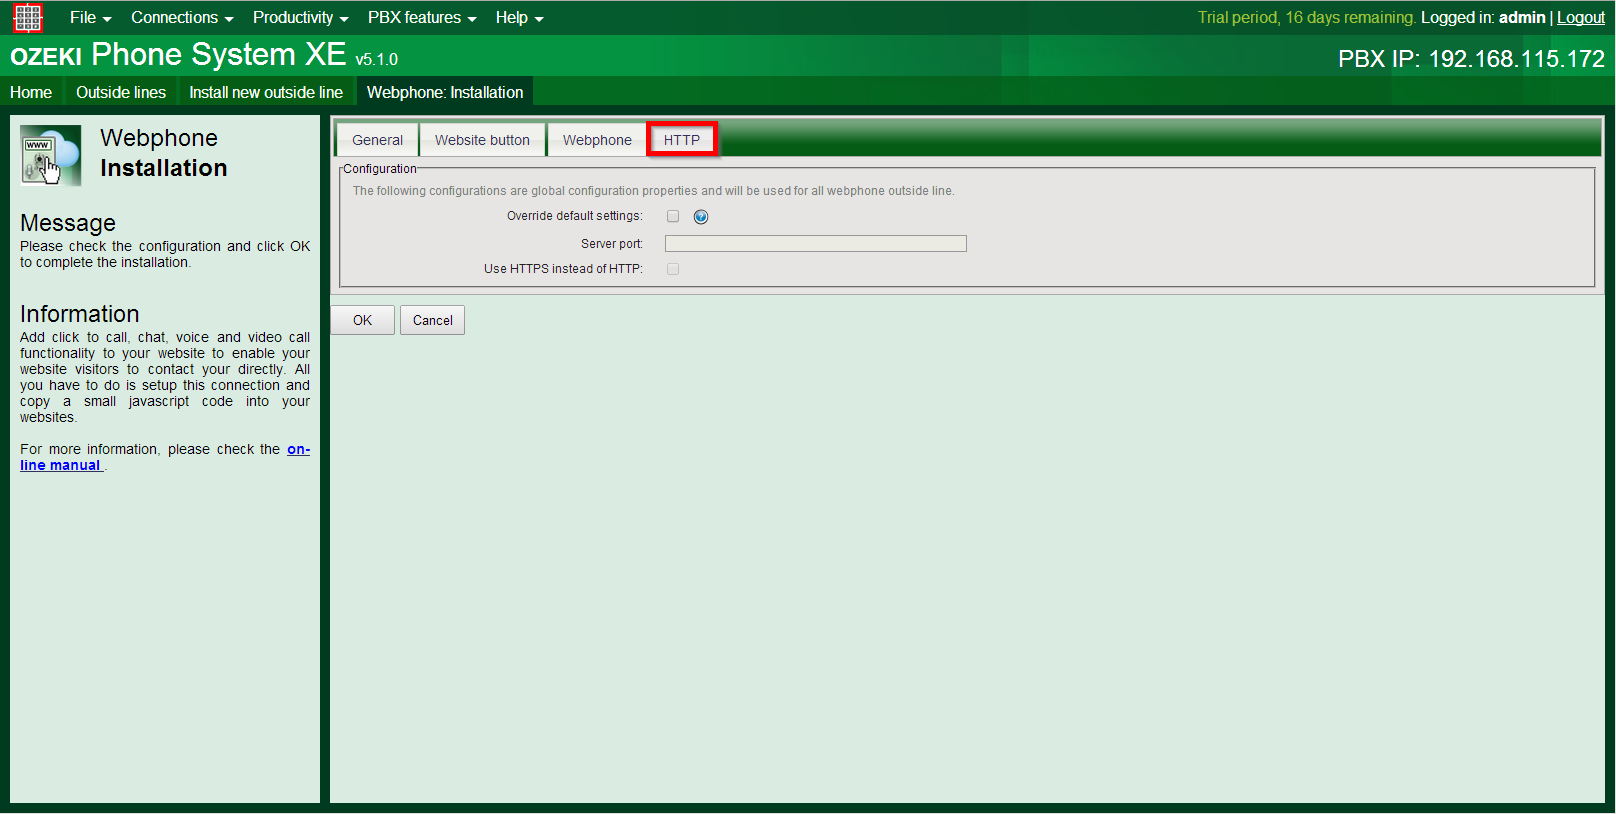
Figure 7 - HTTP settings
Now you need to set an inbound rule to forward incomcing calls from the web pages towards an extension. If you have created the webphone, you will see a yellow warning message which facilitates the inbound rule configuration (Figure 8). This determines, which extension will receive the call from the webphone.
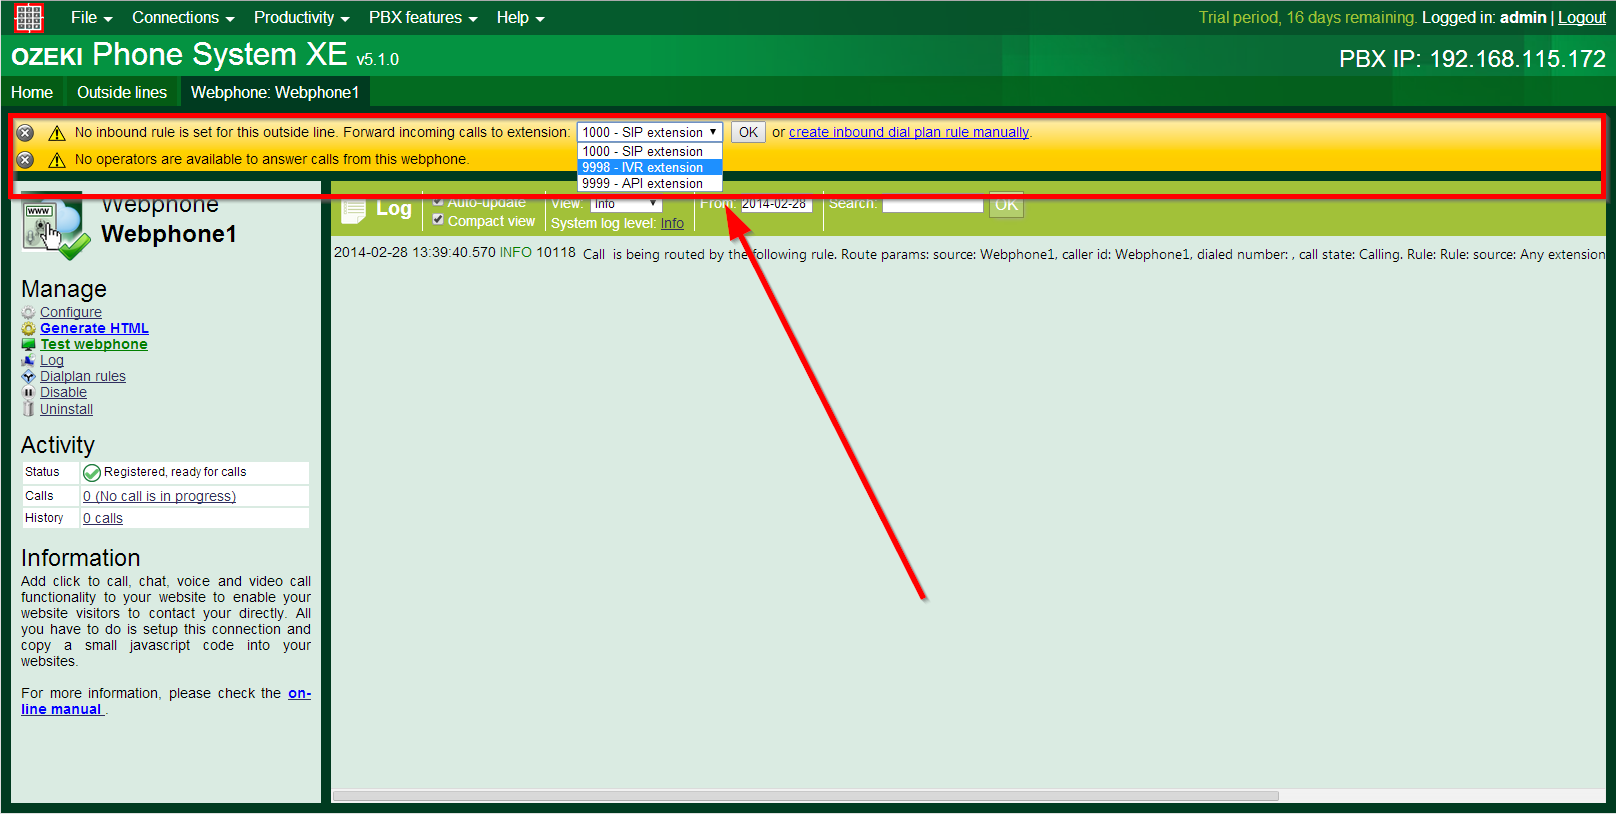
Figure 9 - Inbound rule warning message
Now your webphone is ready to use. If you decide you want to change the configurations, just click on the Configure button (Figure 10) on the left side of the screen.
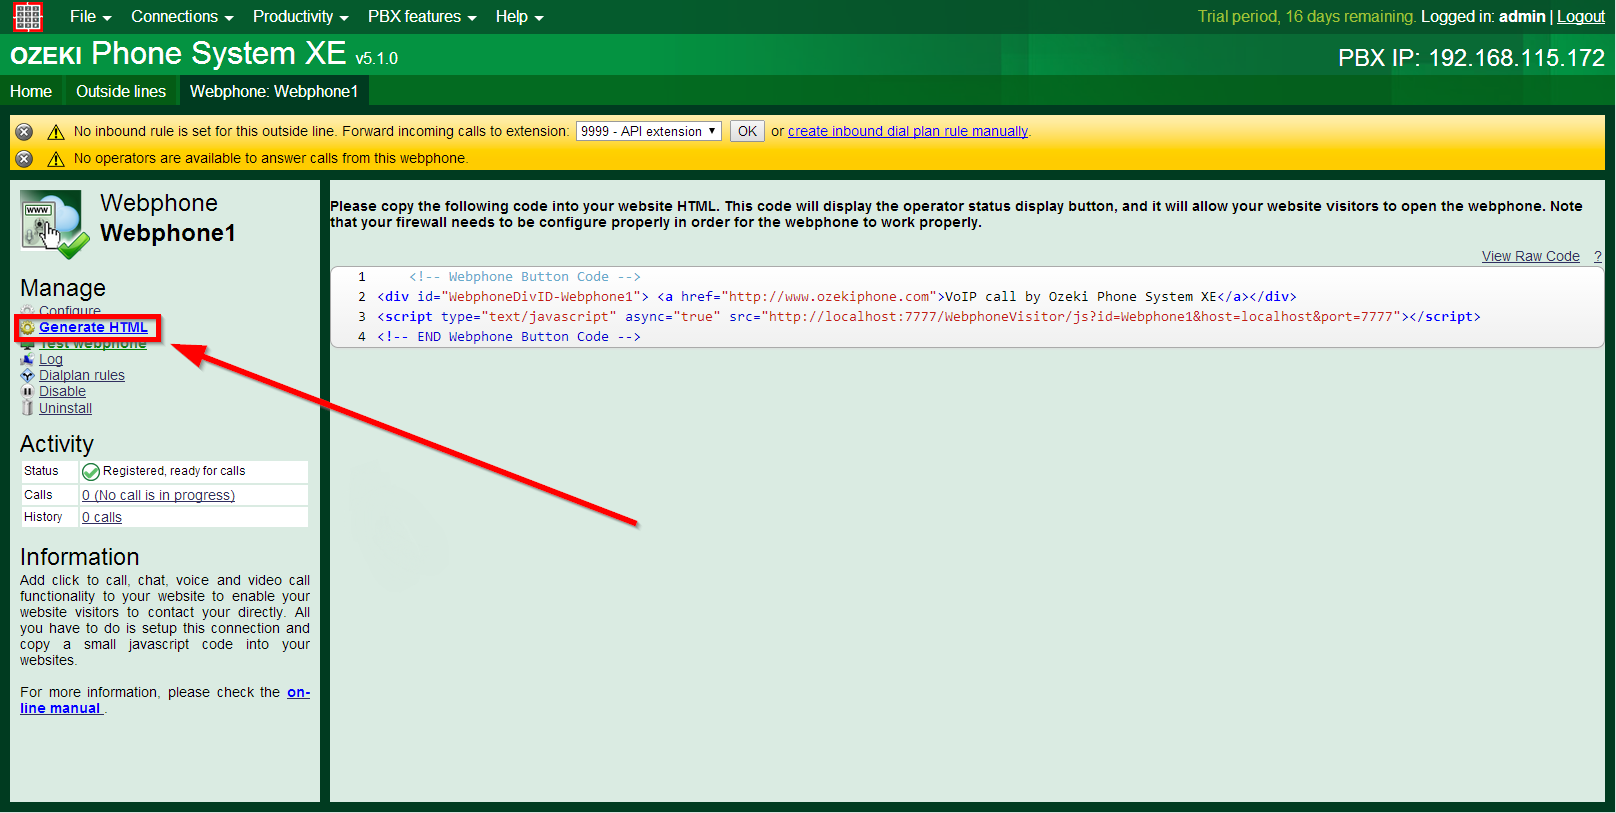
Figure 10 - How to change the configuration
Step 2.) Select Developer friendly webphone type and generate a customizable HTML code
If you want to customize your webphone, first you need to select the type of Webphone. Open the configuration page of the Webphone, and select Webphone tab. Here you can see three types of webphones: Click to call (simplified click to call phone for voice calls only), Webphone with keypad(Fully featured webphone with Voice call and DTMF keypad functionality) and Developer friendly (This webphone is fully customizable by developers). Here, you need to select the third option, theDeveloper friendly mode (Figure 11).
Figure 11 - Choose webphone type
Now click on Generate HTML button to generate the source code that you need to place on your web page (Figure 12).
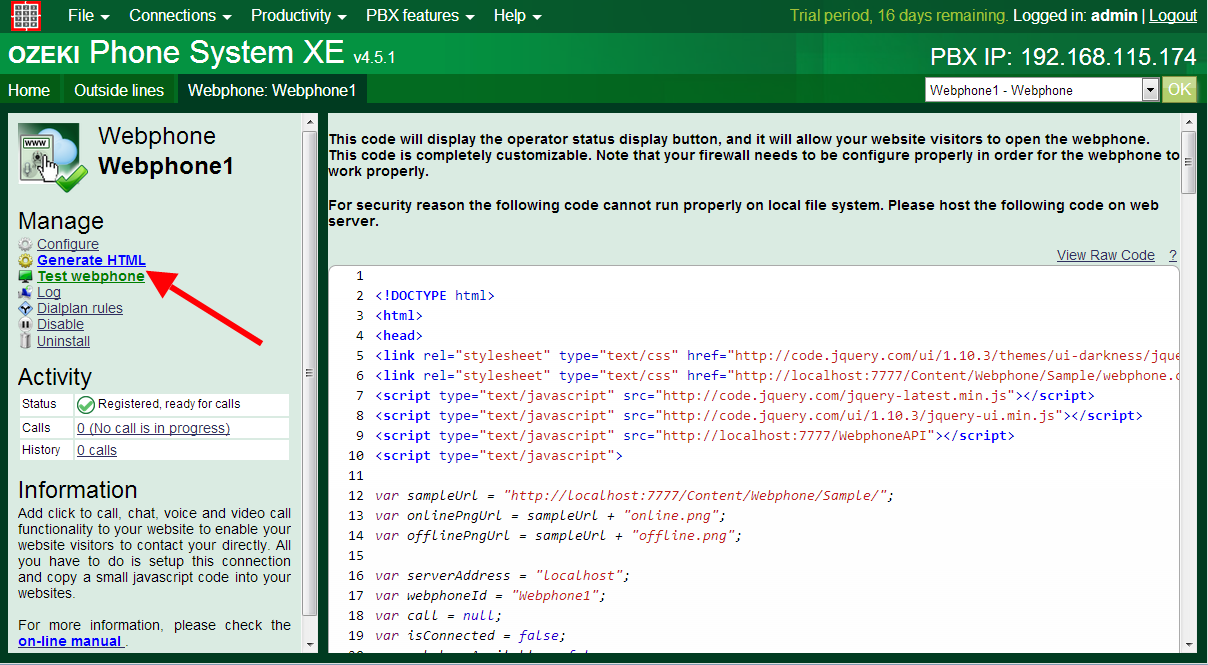
Figure 12 - Click on Generate HTML button
Step 3.) Place the source code on your web page and connect the Webphone to Ozeki Phone system XE
First of all, copy the source code into an HTML file on your webserver. This code is completely customizable. You can customize its skin and you can determine its functionalities. You can use HTML, CSS and JavaScript programming languages (Figure 13).
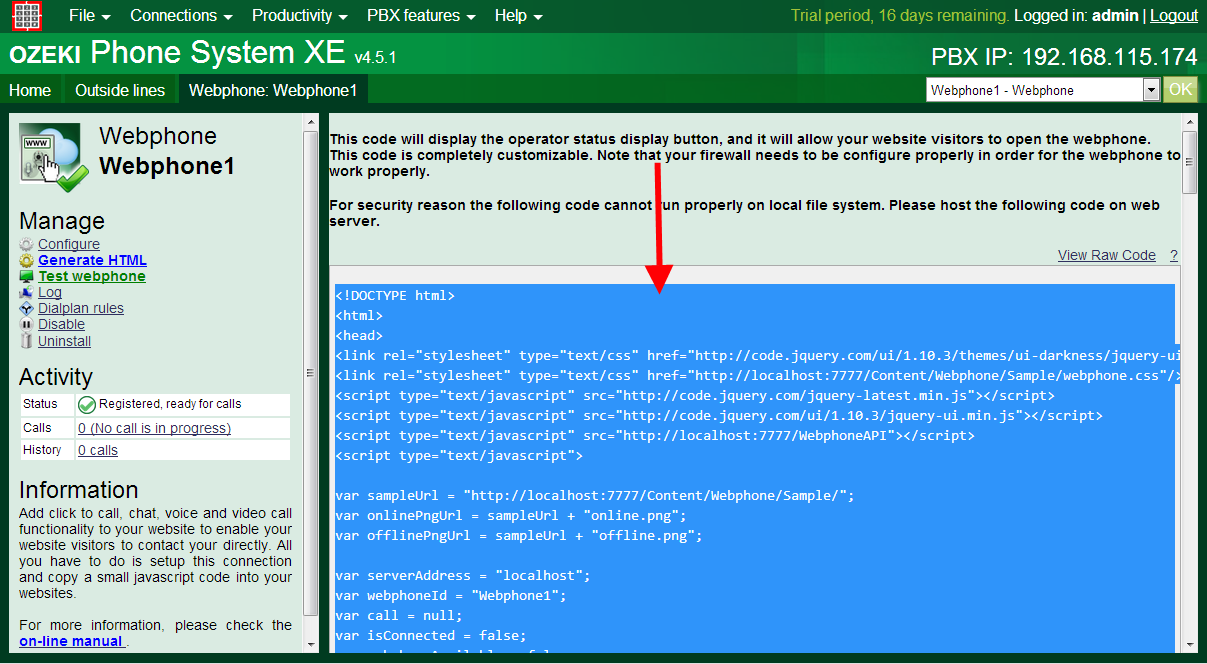
Figure 13 - Copy the generated HTML code
After you have copied the source code to your web server, the generated code will display the operator status display button on your web page, and it will allow your website visitors to open the webphone when they click on it (Figure 14).
Figure 14 - Webphone status icon
If a webphone visitor clicks on the webphone icon, your customized webphone will be opened. If they type the destination phone number and click on the Call button, the destination phone will be ringing (Figure 15).
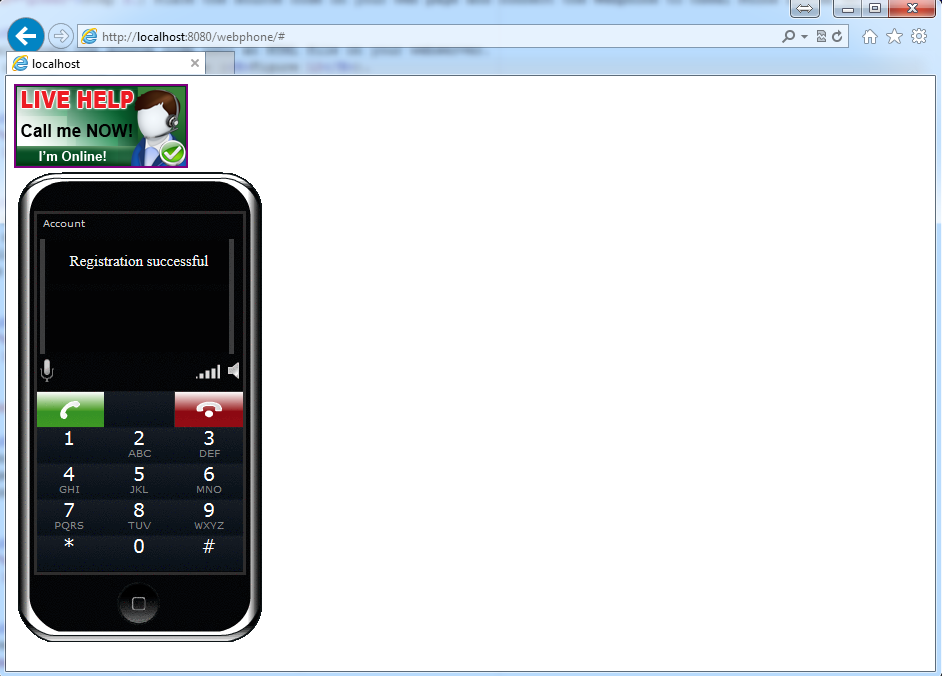
Figure 15 - Customized webphone
Step 4.) Setup your firewall to all features work properly
In this section you can learn about how to reach Ozeki Webphone Gateway in a private network from the Internet if the direct access is blocked for external requests. Access can be blocked either with a firewall or with the help of a router.
Firewall:
If the Ozeki Webphone Gateway has a public IP address, but there is a firewall, every external requests will be blocked by the firewall. Ozeki Webphone Gateway uses the same port for connection as the GUI. In this case the HTTP requests will not reach the port 7777 of the server comes from the Internet. Port 7779 is also used by webphones.
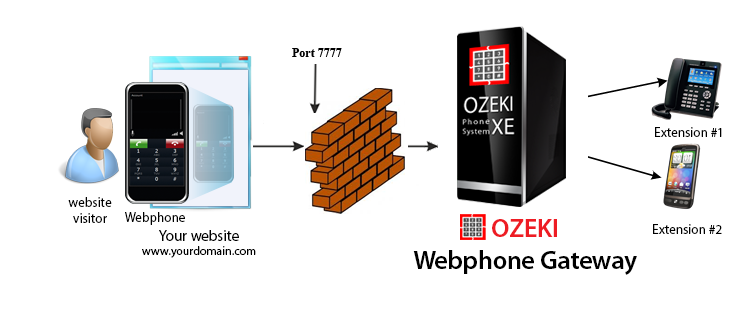
Figure 16 - Port is forwarded by the firewall
To solve this problem access needs to be granted on the firewall run on the server from external computers on port 7777 and port 7779.
Router:
In the second case Ozeki Webphone Gateway has been installed on a computer that is behind a router and we want to use it from the Internet.
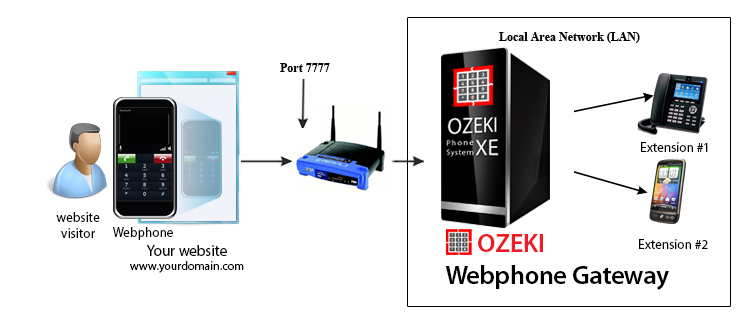
Figure 17 - Port is forwarded by the router
In this examples, the router makes Network Address Translation (NAT) and port forwarding. NAT means that outgoing requests will appear to be originated from the router's IP address. In this example Ozeki Webphone Gateway is installed on a computer in the local area network. It monitors requests on port 7777 and 7779. The 7777 port and 7779 ports need to be forwarded via the router to the PC with IP address of the webphone gateway. This is called port forwarding. With enabling port forwarding, all of the external requests to the port 7777 and port 7779 will be forwarded to the port 7777 and port 7779 of the computer of Ozeki Webphone Gateway.
Conclusion
In this guide you could get information about how to setup Ozeki Webphone Gateway, how to customize it based on your needs and what you need to do if you have a firewall or a router.
If you have any questions or need assistance, please contact us at info@ozekiphone.com
Dig deeper!
People who read this also read...


