Before we go into depth on the differences between Simple Network Management Protocol (SNMP) traps and informs, we must first have a solid understanding of what a trap is.
A trap, also known as a fault or an exception, is a type of synchronous interrupt caused by an extraordinary condition in computing systems. That technical explanation might be confusing to some so let us unpack that sentence using simpler, non-technical language.
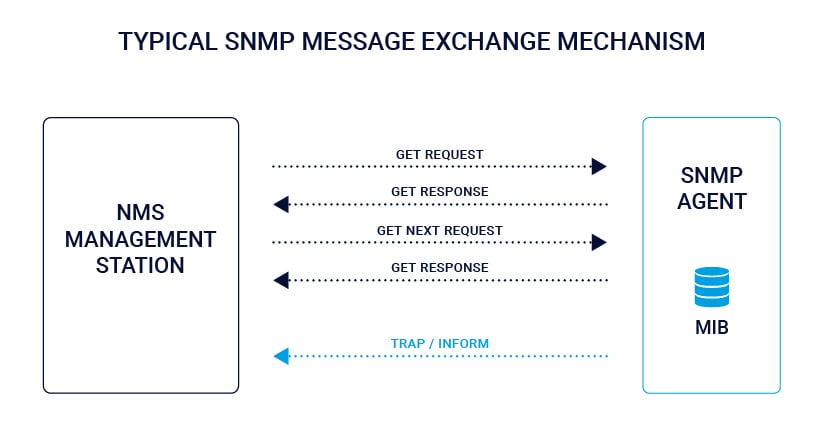
In other words, when something goes wrong an error message is simultaneously generated and sent to a central station where it is recorded and triggers an alert. SNMP Agents embedded in hardware and software systems can be configured to automatically send a trap in the event of critical incidents. SNMP Traps enable an agent to notify the monitoring server of significant events by way of an unsolicited message—thus bypassing and not reliant on the typical SNMP Protocol Data Unit (PDU) message sequence.

Why should I consider using SNMP Traps?
Typically, in SNMP communication, the network monitoring system polling engine or “Manager” (such as a PRTG local or remote probe) actively requests information from the agent by way of the GetRequest/GetResponse message sequence.
In large or clustered network monitoring environments, we typically encounter longer scanning intervals—often 5 minutes or longer—to reduce CPU load on the monitoring server. SNMP traps can notify you of critical events that may arise between longer scanning intervals, which sometimes can be as lengthy as 10 minutes or more.
Before we begin discussing the differences between SNMP traps and Informs, we must first refresh our knowledge on the two main types of IP network communication: TCP and UDP. Having a basic understanding of TCP and UDP helps us understand their important roles in data networking and network monitoring.
Differences between TCP and UDP
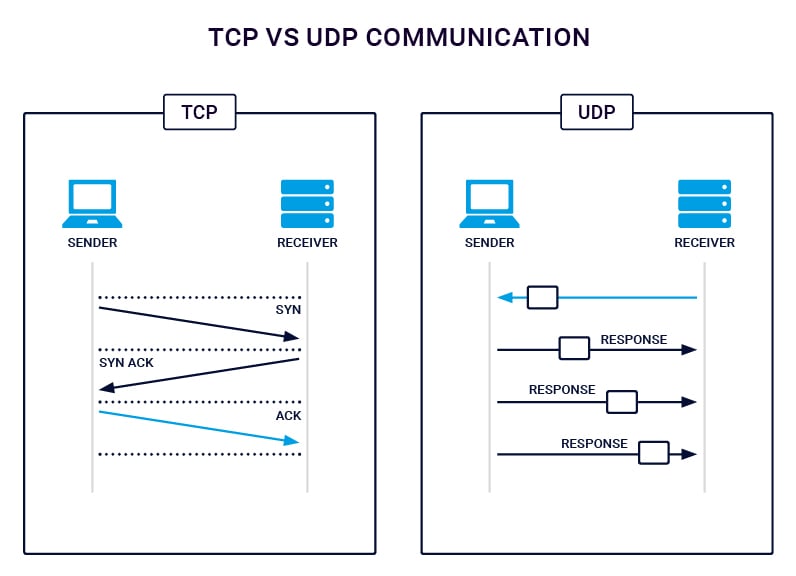
The Transmission Control Protocol (TCP) stack must establish a connection between the source and destination before data can be sent. TCP similarly maintains this connection until the message exchange sequence is complete. This is known as connection setup overhead. A benefit of the connection-oriented nature of TCP, it guarantees ordered transport, provides error recovery and flow control.

The User Datagram Protocol (UDP) however, does not establish a connection before transmitting data. Also, and this is key, while TCP sessions require an acknowledgement after each packet is transmitted, UDP does not. Because of these differences we often refer to TCP as a connection-oriented protocol and UDP as a connection-less protocol.
What are the Advantages and Disadvantages of UDP?
The main advantage of UDP is performance. The speed boost provided by UDP comes from its lack of overhead and a higher transmission capacity. UDP is implemented because it excels at delivering data with the least amount of overhead for loss-tolerating connections. Examples of loss-tolerating connections include DNS, DHCP, NTP, BOOTP, TFTP and our friend SNMP to name a few.
Advantages of UDP:
- UDP lacks connection setup overhead. The sender can immediately start transmission without waiting for a connection to be established.
- Since UDP lacks transport reliability mechanisms its smaller header supports a larger data payload. This larger payload results in fewer packets required than TCP.
- UDP requires fewer resources on both the sender and receiver.
Disadvantages of UDP
- UDP can be unreliable and message delivery is not guaranteed.
- UDP does not implement error control. If UDP detects an error in a received packet, it silently drops it.
With these characteristics of UDP in mind we can now discuss how these features impact network monitoring regarding SNMP Traps and Informs.
What is the difference between an SNMP inform and a trap?
Since SNMP runs over UDP, where delivery is not assured and dropped packets are not reported, the delivery of a Trap is not guaranteed. An SNMP InformRequest (or simply “Inform” for short) is an acknowledged asynchronous notification. Simply put, an Inform is an acknowledged Trap. The InformRequest PDU addresses a limitation of UDP as an acknowledgement is returned to the reporting agent on receipt by the network monitoring system polling engine.
Traps were part of the original SNMP version 1 specification, while Informs were added in SNMP version 2. The central management server (monitoring station) listens for both Traps and Informs on UDP port 162.

For those interested in a little history, the InformRequest PDU was first defined as manager to manager communication only, but subsequent implementations loosened the original specification and since allowed agent to manager communications.
When and where should I consider using Traps?
When:
- To monitor component failure such as: power supplies, fans, hard disks, etc.
- To detect a decreased level of desired redundancy or when degraded fault tolerance has occurred.
- To monitor if critical thresholds are exceeded such as: >90% network bandwidth utilization, excessively high operating temperature, rapidly increasing environmental temperature, less than 10 minutes runtime on UPS, etc.
Where: To monitor critical infrastructure such as servers, storage, networking, AC power distribution, heating, ventilating and air conditioning systems (HVAC).
How does the PRTG SNMP trap receiver sensor work?
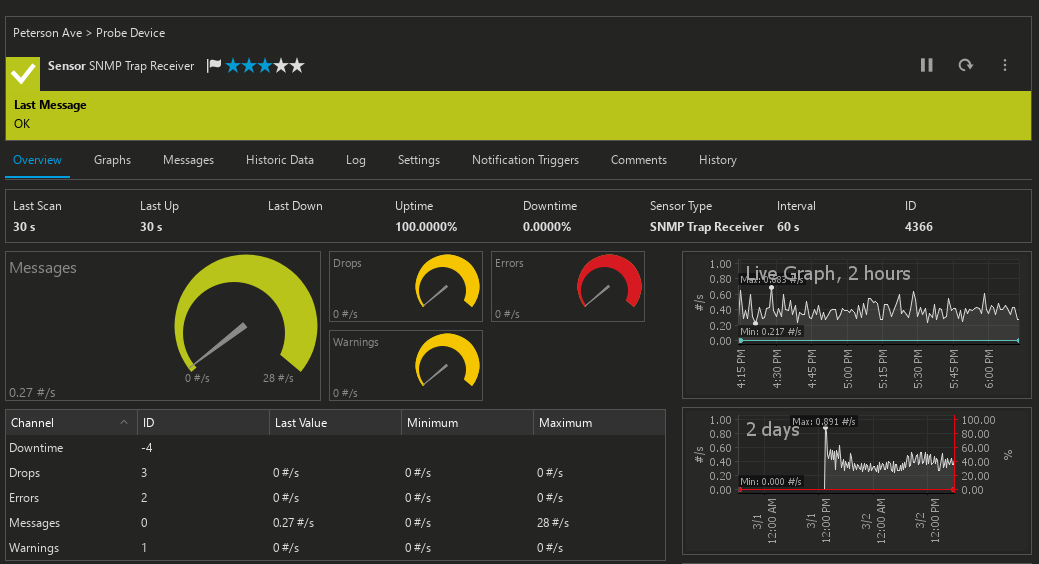
With PRTG Network Monitor, an SNMP Trap Receiver Sensor is a passive sensor that waits for incoming messages. It does not actively query data at fixed intervals, but instead collects incoming trap messages. Like syslog receivers and xFlow sensors, SNMP Trap Receiver Sensors must be configured on PRTG local or remote probes.
The SNMP Trap Receiver Sensor displays the total number of traps received per second, as well as the number of messages that are classified as warnings or errors. PRTG saves incoming trap messages as regular system files, and neatly displays them in the sensor. The Trap Receiver Sensor lets you analyze traps and filter them according to date, source, agents, bindings, and more.

The PRTG server uses this sensor to receive data and – depending on the filter rule – sound the alarm. After you configure an SNMP Trap Receiver Sensor in your environment you may wish to set your own filter rules, configure alerts and enable notifications triggers for certain message types.
Tip: Copy the MIB file from the source device and save it in your PRTG program path. PRTG will use this MIB to make your trap messages legible.
How can I implement an SNMP Trap Receiver Sensor in PRTG?
To setup an SNMP Trap Receiver Sensor in PRTG follow these four steps:
Step 1: Configure the target device
Configure your device to send SNMP traps. Configuration steps vary and are specific to each device. Consult the device vendor for guidance. In general, the IP address and the trap receiver port will be requested.
Step 2: Add the SNMP Trap Receiver Sensor
Select either a local or remote probe and use the “Sensor/Add Sensor” menu option to search for and add the sensor.
Step 3: Configure the sensor
By default, every trap will be received. You can configure filter rules in the sensor settings. The “Exclude” filter lets you exclude certain types of trap messages, e.g. traps from a specific IP address that do not need to be considered. Use the warning and error filters to define those traps which will prompt PRTG to sound the alarm.
Step 4: Setup notifications
In “Notifications,” choose whether you would like to be alerted by e-mail, SMS, push notification, or some other action. You can also opt to be notified when trap messages are received, and have these messages saved so you can analyze the incidents later.
Conclusion
The main benefit of centrally receiving SNMP Traps is immediate notification of critical events that occur between scanning intervals. Properly configured SNMP Agents and the PRTG SNMP Trap Receiver Sensor allow you to take corrective action before minor events become major incidents.
If you want the latest status on your critical infrastructure, configure your most important devices for SNMP Traps and setup an SNMP Trap Receiver Sensor on your PRTG Network Monitor server today!


